
In This Article
Introduction: How Long Do Meal Preps Last, Really?
You spent three hours on Sunday roasting chicken, portioning rice, and lining up ten tidy containers like a tiny edible army. Then Thursday arrives, you pop a lid, and a single question stops you cold: how long do meal preps last, anyway?
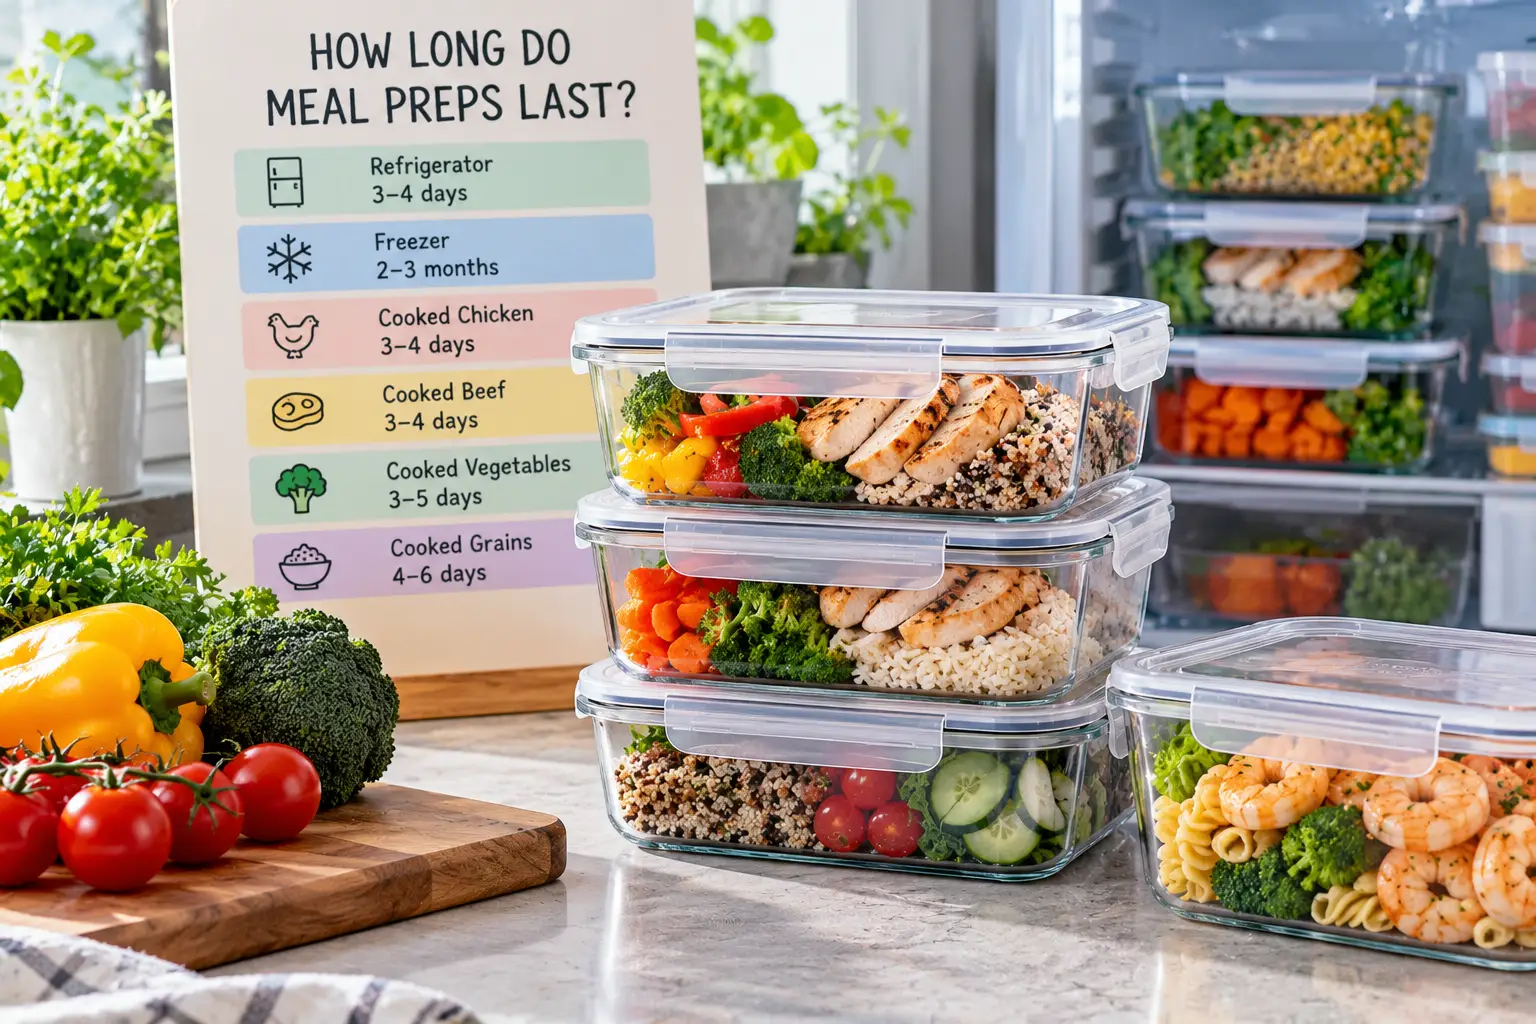
Here’s the direct answer. Most cooked meal prep stays safe for 3 to 4 days in a refrigerator held at 40°F or below, and it stays safe indefinitely in a 0°F freezer, with the best quality for roughly 3 to 4 months. That’s the guidance from USDA’s Food Safety and Inspection Service, and it applies whether you cooked chicken, chili, or a pan of roasted vegetables.
That said, the safety window and the quality window aren’t the same thing. A sealed, properly cooled container of turkey chili can taste nearly as good on day four as on day one. Meanwhile, a loosely covered bowl of the same chili picks up fridge odors, dries at the edges, and makes you wonder whether it’s worth the risk. In other words, how long do meal preps last depends on two things you control: how fast you chill the food and what you store it in.
That’s why this guide goes beyond a chart. You’ll get a food-by-food timeline, a freezer strategy, and a step-by-step Sunday workflow. On top of that, you’ll find an honest breakdown of seven real products — glass containers, a portion-control set, two vacuum sealers, and a humble fridge thermometer — based on spec sheets, independent testing, and aggregated customer reviews. No invented taste tests, no magic promises. Just a clear plan for making your prep last the full week.
Quick Comparison: 7 Tools That Help Your Meal Prep Last Longer
Before the deep dive, here’s the at-a-glance view. Every pick below targets a different weak spot in the meal prep chain: air exposure, leaks, freezer burn, or a fridge running warmer than you think.
| Product | Type | Price Range (at time of writing) | Best For |
|---|---|---|---|
| Rubbermaid Brilliance Glass Set | Glass, latching lids | Roughly $35–$60 | Rubbermaid Brilliance Glass Set: soups, sauces, and commuters |
| OXO Good Grips Smart Seal Glass Set | Borosilicate glass, 4-tab lids | Roughly $45–$75 | OXO Good Grips Smart Seal Glass Set: freezer-to-oven cooks |
| Pyrex Simply Store 18-Piece Set | Tempered glass, snug-fit lids | Roughly $30–$50 | Pyrex Simply Store 18-Piece Set: budget glass at home |
| Bentgo Prep 3-Compartment Set | Plastic, 3 sections | Roughly $20–$35 | Bentgo Prep 3-Compartment Set: portion control on a budget |
| FoodSaver FM2100 | Countertop vacuum sealer | Roughly $100–$150 | FoodSaver FM2100: big-batch freezer prep |
| Anova Precision Vacuum Sealer Pro | Countertop vacuum sealer | Roughly $120–$180 | Anova Precision Vacuum Sealer Pro: sous vide and serious suction |
| Taylor 5924 Fridge/Freezer Thermometer | Analog dial thermometer | Under $15 | Taylor 5924 Fridge/Freezer Thermometer: checking the 40°F line |
Looking at the table, the cheapest item — the Taylor 5924 Fridge/Freezer Thermometer — may protect more meals than anything else on the list, because every storage timeline assumes your fridge actually holds 40°F. For everyday fridge prep, the Rubbermaid Brilliance Glass Set and OXO Good Grips Smart Seal Glass Set lead thanks to latching, gasketed lids. Meanwhile, the FoodSaver FM2100 and Anova Precision Vacuum Sealer Pro only make sense if you freeze in bulk.
💬 One click helps other shoppers make an informed choice too! 😊
Top 7 Meal Prep Storage Picks: Expert Analysis
Each pick below was chosen for a specific job. The commentary is based on manufacturer specs, independent lab and editorial testing, and the recurring themes in real customer reviews — not on a personal test.
1. Rubbermaid Brilliance Glass Set — leakproof champ for soups and commutes
If your meal prep includes anything saucy, this is the set built to stop the dreaded lunch-bag flood.
The glass bases are oven-safe up to 450°F, while the clear lids use Rubbermaid’s StainShield plastic, latch on securely, and carry built-in vents under the latches. In practice, you can reheat without removing the lid — just unlatch it first — and tomato-based sauces won’t leave that orange ghost on the lid. Better still, the universal lids fit across all Brilliance containers, glass or plastic, so you’re not hunting for a matching top.
Rubbermaid Brilliance Glass Set earned top marks in America’s Test Kitchen’s glass storage container testing, where testers found the containers leakproof, heat-resistant, and pleasant to use. That matters for shelf life, not just convenience: an airtight seal limits oxidation and odor transfer, which is exactly what makes day-four chili taste like day-two chili. It’s ideal for commuters and anyone prepping soups, curries, or stews.
Customer reviews consistently praise the leakproof seal for liquid-heavy lunches. The most common caution, echoed by Rubbermaid’s own care instructions, is that the plastic lids aren’t oven-safe and should come off promptly after microwaving to protect the seal.
Pros:
- ✅ Latching lids independently tested as leakproof
- ✅ Glass bases handle the oven up to 450°F
- ✅ Universal lids work across the whole Brilliance line
Cons:
- ❌ Plastic lids can’t go in the oven
- ❌ Glass adds noticeable weight to a lunch bag
Typically in the $35–$60 range depending on set size (check the current price), it’s arguably the best all-around value for fridge-first meal preppers.
2. OXO Good Grips Smart Seal Glass Set — true freezer-to-oven flexibility
This set shines for people who freeze meals and want to bake them later without swapping dishes.
The containers are made of borosilicate glass, which OXO says can go from freezer to oven — or microwave — without fully thawing. Borosilicate handles sudden temperature swings far better than standard glass, so a frozen enchilada portion can head straight into a preheated oven. Four locking tabs work with a removable silicone gasket, and that removable part matters: you can pull it out and wash away the residue that makes fixed seals smell funky over time.
Based on comparing the specs, the OXO Good Grips Smart Seal Glass Set is the strongest pick for batch-freezer cooks who reheat in the oven rather than the microwave. It also stacks and nests neatly, which helps if your freezer resembles a Tetris game on level 12. Additionally, lids are interchangeable with same-size OXO Smart Seal plastic containers, giving you a lighter option for commute days.
Reviews consistently highlight thick, sturdy glass and seals that hold even when the container is turned upside down. The recurring complaint is that the lids take real pressure to close, especially on the larger sizes.
Pros:
- ✅ Borosilicate glass tolerates freezer-to-oven moves
- ✅ Removable gasket makes deep cleaning easy
- ✅ Nests compactly when empty
Cons:
- ❌ Larger lids can be stiff to latch
- ❌ Costs more than tempered-glass alternatives
Usually around $45–$75 for an 8- or 12-piece set at the time of writing, it’s a premium buy that pays off if you freeze often.
3. Pyrex Simply Store 18-Piece Set — budget glass for at-home storage
When you want to ditch stained plastic without spending much, this classic set gets you there.
The containers are tempered glass paired with snug-fit, BPA-free plastic lids, and they’re dishwasher, freezer, and microwave safe. In real-world terms, glass doesn’t absorb garlic or curry odors, so your overnight oats won’t taste faintly of last week’s tikka masala. The 18-piece set covers sizes from 1 cup up to 7 cups, which handles everything from dressing portions to a family-size casserole.
Here’s what to weigh, though: Simply Store lids press on rather than latch. That’s perfectly fine for fridge storage at home, but it’s not the lid you want in a tilted backpack full of soup. So the Pyrex Simply Store 18-Piece Set suits families and home-based preppers who reheat in the kitchen and value sheer quantity over transport security.
Customer feedback generally praises the durable, stain-resistant glass. However, a recurring complaint in reviews on Pyrex’s own site is lid warping after microwave use, plus occasional reports of chipped pieces arriving in shipping.
Pros:
- ✅ Lots of containers for a modest price
- ✅ Glass resists stains and lingering odors
- ✅ Wide size range from 1 to 7 cups
Cons:
- ❌ Press-on lids aren’t leakproof for travel
- ❌ Some reviewers report lids warping in the microwave
Generally found in the $30–$50 range (prices may vary), it’s the best-value route into glass storage for home use.
4. Bentgo Prep 3-Compartment Set — portion control for tight budgets
If your goal is ten balanced lunches in one go, this lightweight set makes the math easy.
The 20-piece kit includes ten 3-compartment trays and ten custom-fit lids, with a 4-cup capacity and measurements embossed inside each tray. Practically speaking, the three sections keep your roasted broccoli from turning soggy under teriyaki sauce, which quietly extends the quality life of a prepped meal. The trays are made from PFAS- and BPA-free materials and are microwave, freezer, and top-rack dishwasher safe.
On paper, the Bentgo Prep 3-Compartment Set is built for macro trackers, students, and anyone who packs grab-and-go lunches rather than soups. Because the containers are light and stackable, they also fit a crowded office fridge far better than heavy glass. Just remember Bentgo’s own instruction: take the lid off before microwaving.
Reviews commonly describe the set as practical and easy to organize. That said, some buyers say the lids feel less sturdy than the trays, and a subset reports warping after microwave use.
Pros:
- ✅ Built-in compartments keep textures separate
- ✅ Embossed measurements simplify portioning
- ✅ Very light for carrying several meals
Cons:
- ❌ Not designed for liquid-heavy meals
- ❌ Some users report lid or tray warping
Usually around $20–$35 at the time of writing, it’s the cheapest way to prep a full workweek of portioned lunches.
5. FoodSaver FM2100 — the freezer workhorse with a 5-year warranty
For big-batch cooks who fill the freezer, this sealer removes the air that causes freezer burn.
It’s a manual, compact sealer with built-in roll storage and a cutter, so you can make custom-size bags without scissors. FoodSaver says it uses up to 40% less bag material than its older models, which matters because bags are the real long-term cost. Dual heat-sealing strips aim for consistent seals, and an accessory hose connects to FoodSaver canisters and a handheld sealer.
Here’s the honest caveat many listings skip: vacuum sealing dramatically improves freezer quality, but it doesn’t override the USDA’s 3-to-4-day fridge window for cooked food. Removing oxygen slows spoilage you can see and smell; it doesn’t stop every pathogen. So the FoodSaver FM2100 is best for hunters, bulk shoppers, and anyone freezing soups and proteins for months — not for stretching fridge meals into week two.
Long-time owners frequently report their previous units lasting a decade or more. On the other hand, common complaints involve the awkward placement of the roll cutter during batch sessions and occasional hinge issues.
Pros:
- ✅ Built-in roll storage and cutter
- ✅ Five-year limited warranty is rare at this price
- ✅ Accessory port expands to canisters
Cons:
- ❌ Cutter workflow is slow for large batches
- ❌ Manual operation takes a little practice
Typically between $100 and $150 (check the current price), it’s excellent value if you freeze at least weekly.
6. Anova Precision Vacuum Sealer Pro — premium suction for serious preppers
Built with sous vide cooks in mind, this sealer pulls one of the strongest vacuums in its class.
In independent lab testing by Shouldit, it reached 68 kPa of suction, and its seal survived a water bath on the first attempt. Translated to your kitchen, that means marinated chicken or a portion of short ribs can go from sealer to freezer to sous vide bath without leaks. It also offers moist mode, pulse vacuum, a lever-style lid lock, and built-in roll storage with a cutter.
Based on the test data, the Anova Precision Vacuum Sealer Pro fits cooks who seal wet foods often or already own a sous vide circulator. The flip side is raw power: the same lab found it crushed a large share of brittle snacks when run on full auto. The pulse button solves that with practice, but it’s not a set-it-and-forget-it machine for crackers or chips.
Editorial reviewers, including America’s Test Kitchen, rate its performance highly, though they note the built-in bag cutter can feel flimsy and occasionally jam. Also, depending on the bundle, bags may not be included.
Pros:
- ✅ Top-tier suction in independent testing
- ✅ Dedicated moist mode for juicy foods
- ✅ Compact footprint with roll storage
Cons:
- ❌ Crushes fragile foods without careful pulsing
- ❌ Bag cutter can jam occasionally
Usually in the $120–$180 range at the time of writing, it’s a smart splurge for sous vide fans, less so for casual preppers.
7. Taylor 5924 Fridge/Freezer Thermometer — cheapest insurance for every meal
This tiny dial answers the question nobody asks until something spoils: is your fridge actually at 40°F?
It’s a large 3-inch analog dial that can hang from a shelf or stand on its own, and it needs no batteries. That simplicity is the point — there’s no screen to die and no app to pair. Every timeline in this article assumes 40°F or colder, yet many built-in fridge dials show settings like “4,” not actual temperatures.
Honestly, the Taylor 5924 Fridge/Freezer Thermometer belongs in every meal prepper’s fridge, whatever containers you choose. It’s especially useful for older refrigerators, overpacked fridges after a big Sunday cook, and door-heavy households where the temperature swings all day. Place it on the middle shelf, not the door, for a realistic reading.
Customer feedback on this model is generally positive about readability and reliability, although it’s harder to verify detailed review data than for the containers above. The main trade-off reviewers of analog dials mention is that they read more slowly than digital thermometers and can be hard to see in dim light.
Pros:
- ✅ Battery-free, so nothing to replace
- ✅ Large dial is easy to read
- ✅ Tiny cost protects a whole fridge
Cons:
- ❌ Slower to react than digital models
- ❌ No alarm or min/max memory
Almost always under $15, it offers the highest value-per-dollar of anything on this list.
The Top 7 at a Glance
| Product | Seal Style | Oven-Safe Base | Freezer Role | Common Review Theme | Best For |
|---|---|---|---|---|---|
| Rubbermaid Brilliance Glass Set | 4 latches, vented lid | Yes (to 450°F) | Good | Leakproof for soups | Rubbermaid Brilliance Glass Set: commuters |
| OXO Good Grips Smart Seal Glass Set | 4 tabs + removable gasket | Yes (borosilicate) | Excellent | Stiff but secure lids | OXO Good Grips Smart Seal Glass Set: freeze-then-bake |
| Pyrex Simply Store 18-Piece Set | Press-on lid | Glass only | Good | Lids may warp | Pyrex Simply Store 18-Piece Set: home storage |
| Bentgo Prep 3-Compartment Set | Custom-fit lid | No | Fair | Lids feel light | Bentgo Prep 3-Compartment Set: portioned lunches |
| FoodSaver FM2100 | Heat-sealed bag | N/A | Excellent | Durable, slow cutter | FoodSaver FM2100: bulk freezing |
| Anova Precision Vacuum Sealer Pro | Heat-sealed bag | N/A | Excellent | Strong suction | Anova Precision Vacuum Sealer Pro: sous vide |
| Taylor 5924 Fridge/Freezer Thermometer | N/A | N/A | Monitors temp | Simple, readable | Taylor 5924 Fridge/Freezer Thermometer: everyone |
Reading across the “Seal Style” column tells you most of what you need: latching, gasketed lids — the Rubbermaid Brilliance Glass Set and OXO Good Grips Smart Seal Glass Set — are the ones to trust with liquids. Heat-sealed bags from the FoodSaver FM2100 or Anova Precision Vacuum Sealer Pro win for long freezer stays, while the Pyrex Simply Store 18-Piece Set and Bentgo Prep 3-Compartment Set trade seal strength for price and portability.
✨ Build a meal prep setup that actually lasts all week!
🔍 Take your meal prep to the next level with this carefully curated lineup. Click a highlighted item to check current pricing and availability. These picks will help you enjoy fresher, safer lunches the whole family will look forward to! 🥗
How Long Does Meal Prep Last in the Fridge? A Food-by-Food Breakdown
The USDA’s blanket 3-to-4-day rule is the ceiling, not a guarantee of great taste. So, how long does meal prep last in the fridge once you factor in texture? The answer shifts by ingredient.
| Meal Prep Item | Fridge (40°F or below) | Freezer Best Quality (0°F) | Best For |
|---|---|---|---|
| Cooked chicken, beef, pork, fish | 3–4 days | About 2–4 months | Freezing on day one if eating after Wednesday |
| Cooked rice and pasta | 3–4 days (chill fast) | About 1–2 months | Prepping in smaller batches |
| Soups, stews, chili | 3–4 days | About 2–3 months | Freezing in single portions |
| Hard-cooked eggs | Up to 1 week | Not recommended | Breakfast boxes |
| Cooked leafy greens | Often best by day 2–3 | Varies | Eating early in the week |
This table explains why smart preppers eat their fish and greens on Monday and Tuesday, then save sturdier chili and roasted meats for Thursday. Rice deserves special respect: the bacterium Bacillus cereus can survive cooking, and slow cooling gives it time to produce toxins that reheating won’t destroy. Therefore, the “chill fast” note matters more for your grain bowls than for almost anything else.
A few practical translations help here. Cream-based sauces tend to separate and weep sooner than tomato- or broth-based ones, even though the safety window is the same. Dressed salads wilt within a day, so keep dressing in a separate small container. Crispy toppings — croutons, tortilla strips, toasted nuts — belong in their own bag until serving.
Also, remember that the clock starts when the food is cooked, not when you pack it. If Sunday’s chicken sat on the counter while you portioned everything else, count that time. When in doubt, a simple rule works: if you won’t eat it within four days of cooking, it belongs in the freezer tonight.
How Long Can Meal Prep Last in the Freezer? Your Long-Game Strategy
So, how long can meal prep last in the freezer? From a safety standpoint, food held at a steady 0°F stays safe indefinitely, because freezing halts bacterial growth. Quality is another story: most cooked meals taste best within about 2 to 4 months, depending on the dish.
The enemy isn’t bacteria here — it’s air. Freezer burn happens when moisture escapes from the food’s surface and oxidizes, leaving gray, leathery patches. It’s not dangerous, but it turns tender chicken into jerky with a grudge. That’s precisely where the FoodSaver FM2100 and Anova Precision Vacuum Sealer Pro earn their counter space: removing air before freezing slows that moisture loss dramatically. If you’d rather use containers, the borosilicate OXO Good Grips Smart Seal Glass Set is the safest glass choice for freezer-to-oven cooking.
Here’s how to structure a freezer rotation:
- ✅ Freeze flat. Lay bagged soups flat on a sheet pan until solid, then stack them like files.
- ✅ Leave headspace. Liquids expand when frozen; leave about an inch in rigid containers.
- ✅ Label everything. Write the dish and the date — “mystery brown block” is not a meal plan.
- ✅ Thaw in the fridge. Move tomorrow’s lunch down tonight, then eat it within 3 to 4 days of thawing.
One more nuance: freezer-friendliness varies by recipe. Soups, stews, chili, meatballs, and burritos freeze beautifully. By contrast, cooked pasta can turn mushy, and potatoes in soups may go grainy. For those dishes, freeze the sauce and cook the starch fresh.
Your Sunday Meal Prep Game Plan: Cook, Cool, Store, Reheat
Great storage starts before food touches a container. Here’s a practical workflow that protects both safety and flavor, based on federal guidance and Michigan State University Extension’s guide to handling leftovers.
Step 1: Plan your eating order
Before cooking, decide which meals get eaten first. Put fish, dressed salads, and cooked greens on Monday and Tuesday. Save chili, braised meats, and grain bowls for later in the week. Anything planned for Friday goes straight into the freezer.
Step 2: Cool fast, not slow
Don’t leave pots on the stove “to cool down first.” Food should be refrigerated within 2 hours of cooking, or within 1 hour if the room is above 90°F. Instead, divide big batches into shallow containers so the center chills quickly. Hot food can go directly into the fridge — just don’t pack containers so tightly that cold air can’t circulate.
Step 3: Seal with purpose
Use latching lids, like those on the Rubbermaid Brilliance Glass Set, for saucy dishes, and compartment trays, like the Bentgo Prep 3-Compartment Set, for meals with mixed textures. Keep dressings, sauces, and crunchy toppings separate.
Step 4: Store smart
Place meal prep on middle or lower shelves, not in the door, which is the warmest zone. Check that your Taylor 5924 Fridge/Freezer Thermometer reads 40°F or below after loading.
Step 5: Reheat thoroughly
Reheat leftovers to 165°F throughout, and bring soups and sauces to a boil. Stir halfway through microwaving to kill cold spots.
Real-World Scenarios: Matching Your Routine to the Right Setup
The right gear depends less on the “best” product and more on how you actually eat. Here are three common profiles.
🚇 The commuting professional (budget: about $60–$90)
Picture someone who preps five lunches on Sunday and carries one each morning by subway or car. Leaks are the biggest risk, followed by a warm office fridge. For this person, the Rubbermaid Brilliance Glass Set handles saucy dishes, while a Taylor 5924 Fridge/Freezer Thermometer at home confirms the storage baseline. Since lunches run through Friday, prepping Monday–Wednesday meals fresh and freezing Thursday and Friday portions keeps everything inside the 3-to-4-day window.
👨👩👧 The busy family of four (budget: about $140–$200)
Now imagine a household that batch-cooks dinners twice a week and freezes extra portions. Volume and flexibility matter most. The Pyrex Simply Store 18-Piece Set covers everyday leftovers at home, and the FoodSaver FM2100 turns Sunday’s double batch of meatballs into flat, labeled freezer packs for the next two months. Here, the vacuum sealer pays for itself by reducing tossed food.
🏋️ The fitness-focused solo prepper (budget: about $150–$250)
Finally, consider someone tracking macros who preps ten meals at once and cooks proteins sous vide. Portion accuracy and long-term freezing both matter. The Bentgo Prep 3-Compartment Set makes portioning fast, while the Anova Precision Vacuum Sealer Pro seals marinated proteins for the freezer and the water bath. Meals for days five through ten live in the freezer, not the fridge.
Notice the common thread: in all three cases, the freezer carries anything beyond day four. No container, however premium, changes that rule.
Problem → Solution: Fixing the 5 Most Common Meal Prep Storage Headaches
Even careful preppers hit the same snags. Here’s how to fix them.
Problem 1: Soggy vegetables by Wednesday. ✅ Solution: Moisture migrates from sauces into vegetables. Use the separate sections in the Bentgo Prep 3-Compartment Set, or pack sauce in a small side container. Slightly undercooking vegetables also helps, since reheating finishes them.
Problem 2: Soup leaking inside your bag. ✅ Solution: Press-on lids aren’t built for tilting. Switch to four-latch designs like the Rubbermaid Brilliance Glass Set or the OXO Good Grips Smart Seal Glass Set, and don’t overfill — leave a little space below the rim.
Problem 3: Freezer-burned chicken. ✅ Solution: Air contact is the culprit. Vacuum seal with the FoodSaver FM2100, or at least press every bit of air out of a freezer bag. Eat frozen proteins within a few months for the best texture.
Problem 4: Containers that smell like last week’s curry. ✅ Solution: Plastic absorbs odors over time; glass doesn’t. For gasketed lids, remove and wash the silicone seal separately — a feature the OXO Good Grips Smart Seal Glass Set makes easy.
Problem 5: Food spoiling before day three. ✅ Solution: Your fridge may be running warm. Put a Taylor 5924 Fridge/Freezer Thermometer on the middle shelf overnight. If it reads above 40°F, lower the setting and avoid overpacking, which blocks airflow.
In most cases, spoilage issues trace back to either temperature or air exposure. Fix those two variables, and the rest of the week usually takes care of itself.
How to Choose Meal Prep Containers That Actually Extend Freshness
Not all meal prep containers are equal when it comes to shelf life. Use these steps to narrow your choice:
- Start with the seal. Latching lids with a silicone gasket keep air and odors out far better than press-on lids, which directly supports quality over four days.
- Pick the material for your reheating style. Glass is best if you reheat in the oven or care about stains; plastic wins on weight and portability.
- Check the glass type if you freeze. Borosilicate glass handles freezer-to-oven moves better than tempered soda-lime glass, so it’s worth it for freeze-then-bake cooks.
- Match sizes to your meals. Two-cup containers suit single portions of protein and grains; larger 4-cup sizes fit full meals or family servings.
- Consider compartments. If textures matter to you, divided trays prevent sogginess and make portioning faster.
- Look at lid replacement. Lids fail before glass does, so brands with universal or readily available lids save money long-term.
- Think about stacking. Uniform shapes stack efficiently, leaving room for cold air to circulate — which helps food chill quickly and stay cold.
In short, the best meal prep containers are the ones that seal tightly, fit your reheating habits, and leave space in your fridge. The Rubbermaid Brilliance Glass Set checks the most boxes for general use, while the OXO Good Grips Smart Seal Glass Set leads for freezer cooks.
Glass vs. Plastic vs. Vacuum Bags: Which Storage Method Wins?
Compared with the traditional options many of us grew up with — takeout tubs, zip-top bags, and plastic wrap over a bowl — purpose-built storage offers clear advantages.
| Storage Method | Seal Quality | Odor/Stain Resistance | Freezer Performance | Best For |
|---|---|---|---|---|
| Latching glass (Rubbermaid Brilliance Glass Set, OXO Good Grips Smart Seal Glass Set) | Excellent | Excellent | Good to excellent | Fridge prep and reheating |
| Portion plastic (Bentgo Prep 3-Compartment Set) | Fair to good | Fair | Fair | Light, portable lunches |
| Vacuum bags (FoodSaver FM2100, Anova Precision Vacuum Sealer Pro) | Excellent | Good | Excellent | Months-long freezing |
| Takeout tubs and plastic wrap | Poor | Poor | Poor | Very short-term storage only |
The table makes the trade-off obvious: takeout tubs and plastic wrap are free, but they let in air and odors, which shortens how long food tastes good even within the safe window. Latching glass is the best everyday upgrade, whereas vacuum bags are a specialist tool for the freezer.
Beyond the table, consider the long game. Glass is heavier and can break if dropped, but it doesn’t absorb odors or stain, and it can often go straight into the oven. Plastic is lighter and cheaper upfront, yet it tends to scratch, stain, and warp with repeated microwaving. Vacuum bags deliver unbeatable freezer protection but are mostly single-use, adding an ongoing cost.
For most households, the practical answer is a hybrid: glass for home storage and reheating, lightweight plastic for commuting, and a vacuum sealer only if you freeze in bulk regularly.
Common Mistakes That Cut Your Meal Prep’s Shelf Life Short
Even with great containers, a few habits quietly shorten how long your food stays good.
Mistake 1: Cooling food on the counter for hours. Many people believe hot food shouldn’t go in the fridge. In reality, USDA guidance says leftovers should be refrigerated promptly, even while still steaming. Divide them into shallow containers instead.
Mistake 2: Counting from the day you packed, not the day you cooked. If you cooked chicken Saturday and packed it Sunday, Saturday is day one.
Mistake 3: Storing meal prep in the fridge door. The door is the warmest, most temperature-variable spot. Keep prepped meals on interior shelves.
Mistake 4: Trusting the smell test. Pathogenic bacteria often don’t change a food’s smell, taste, or appearance. Food that smells fine on day six is still past the recommended window.
Mistake 5: Refreezing without a plan. Food thawed in the fridge can technically be refrozen, but quality suffers each time. Portion before freezing so you only thaw what you’ll eat.
Mistake 6: Overpacking the fridge after a big cook. Ten warm containers crammed together can temporarily raise the fridge temperature. Space them out, and use a Taylor 5924 Fridge/Freezer Thermometer to confirm things settle back to 40°F.
Each of these mistakes is easy to fix, and fixing them often matters more than the brand of container you buy.
Safety, Standards, and the Science Behind the 40°F Rule
Why does nearly every cooked food get the same 3-to-4-day window? The logic comes down to two families of bacteria, as explained in USDA’s Ask FSIS explainer on cooked-food storage. Spoilage bacteria make food smell and look bad. Pathogenic bacteria — the ones that cause foodborne illness — often don’t change the food at all. Refrigeration slows both but doesn’t stop them.
That’s why the USDA “danger zone” matters: bacteria multiply fastest between 40°F and 140°F. Keeping your fridge at or below 40°F slows growth enough that most cooked foods stay within a safe range for three to four days. After that, organisms such as Listeria, which can grow even in the cold, have had time to reach risky levels.
A few standards-related notes are worth knowing when you shop:
- ✅ BPA-free and PFAS-free labels: Many modern meal prep containers, including the Bentgo Prep 3-Compartment Set, advertise PFAS- and BPA-free materials. These are manufacturer claims, so check product pages for details.
- ✅ Microwave directions matter: Many brands specify reheating with lids removed or unlatched. Following those directions protects the seal and avoids warping.
- ✅ Oven ratings apply to glass bases only: Plastic lids — even on premium sets — should stay out of conventional ovens.
Finally, vacuum sealing deserves a safety footnote. Removing oxygen doesn’t make cooked food safe beyond the standard fridge window; some bacteria thrive without air. So treat vacuum-sealed cooked meals exactly like any other leftovers in the fridge, and rely on the freezer for longer storage.
Long-Term Cost: Is Better Meal Prep Storage Worth It?
Good storage costs money upfront, so it’s fair to ask whether it pays back. The honest answer: usually, yes — if it prevents wasted food.
Consider the math in plain terms. If a week of home-cooked lunches costs roughly $30 to $50 in ingredients, losing just two spoiled meals a week adds up quickly over a year. A $40–$60 set of latching glass containers doesn’t need to save many meals to justify itself.
Here’s how each category compares over time:
- ✅ Glass containers (Rubbermaid Brilliance Glass Set, OXO Good Grips Smart Seal Glass Set, Pyrex Simply Store 18-Piece Set): Higher upfront cost, but the glass can last for years. Budget for occasional lid replacements, since lids wear out first.
- ✅ Plastic portion containers (Bentgo Prep 3-Compartment Set): Lowest entry price, but plan on replacing them more often as they stain or warp.
- ✅ Vacuum sealers (FoodSaver FM2100, Anova Precision Vacuum Sealer Pro): The machine is a one-time purchase, but bags are an ongoing expense. The FoodSaver FM2100 offsets that somewhat with its reduced bag usage and 5-year limited warranty.
- ✅ Thermometer (Taylor 5924 Fridge/Freezer Thermometer): Costs almost nothing and never needs batteries.
For maintenance, wash silicone gaskets separately every few uses, keep plastic lids on the dishwasher’s top rack, and avoid sudden temperature shocks with tempered glass. Those small habits stretch the life of your gear and keep seals tight.
FAQ: Your Top Meal Prep Storage Questions
❓ Are glass meal prep containers worth the extra money?
❓ Is a vacuum sealer worth it for weekly meal prep?
❓ Can I put hot meal prep straight into the fridge?
❓ Do meal prep containers need to be airtight to be safe?
❓ What size meal prep containers should I buy?
Conclusion: Make Every Meal Prep Last the Full Week
So, how long do meal preps last? For cooked food in a 40°F fridge, plan on 3 to 4 days, then let the freezer handle the rest. That single rule, backed by USDA guidance, shapes everything else: which meals you eat first, when you freeze, and how you store.
The good news is that the gear doesn’t need to be complicated. Latching, gasketed containers like the Rubbermaid Brilliance Glass Set or the OXO Good Grips Smart Seal Glass Set protect flavor and stop leaks. The Pyrex Simply Store 18-Piece Set and Bentgo Prep 3-Compartment Set offer budget-friendly paths into organized prep. If you freeze in bulk, the FoodSaver FM2100 or Anova Precision Vacuum Sealer Pro keeps freezer burn at bay for months. And the Taylor 5924 Fridge/Freezer Thermometer quietly makes sure every timeline in this guide actually holds true.
Ultimately, meal prep is about buying back time during a busy week. When you cool food quickly, seal it well, and keep your fridge cold, your Thursday lunch can taste nearly as good as Monday’s — no guesswork required.
🚀 Ready to make your meal prep last longer?
🔍 Upgrade your storage with the picks above and enjoy fresher, safer meals all week. Click a highlighted item to check current pricing and availability, and start your next Sunday prep with confidence! 🥡
Recommended for You
- Glass Dressing Container: 7 Best Leakproof Picks for 2026
- Commercial Food Storage Boxes: 7 Best Picks That Last (2026)
- Restaurant Plastic Containers: 7 Best Picks That Last (2026)
Disclaimer: This post contains affiliate links. As an Amazon Associate, I earn from qualifying purchases made through these links, at no additional cost to you.
✨ Found this article helpful? Share it with someone who needs it! 💬🤗